With Lync, Microsoft introduced many new concepts in functionality, topology and terminology. As always, the best practice for the Network/Lync administrator would be to get familiar with the Lync Server documentation published on TechNet: http://technet.microsoft.com/en-us/library/gg398616.aspx. If you accept advices, here is one: NEVER blindly trust ANY guide out there (including this one ) While those might be correct for THEIR particular case, we all know - there are no two environments with the exact same layout and specifics. Always have in mind what have you see here and compare to your environment before click “Next”…
We are now ready to proceed with the installation. As I said earlier, I am planning to install Lync Standard Edition Server which consists of:
-A collocated SQL Server database
-A collocated Mediation Server and collocated A/V Conferencing Server on the Standard Edition server
Let’s start by running Setup from our installation media. Because we already installed all prerequisites, the startup screen appears (almost) immediately. Leave the default “Installation Location” and click “Install”. This step will install the Core Components necessary for the Deployment Wizard to run.
Accept the license agreement and click OK. Wait until the Core Components are installed and Deployment Wizard appear.
***Note the check mark in “Prepare Active Directory” section:
…this is because in the previous step we have completed it successfully. Fact is – you cannot proceed with the installation if this condition was not satisfied.
First, Install “Topology Builder”. This is the “wizard-driven user interface that you use to create and edit your Microsoft Lync Server 2010 topology” as per TechNet description (but of course you already know that… if you followed my advice above and spent quality time with the documentationJ)
***If you are planning to run Lync in mixed OCS/Lync environment (which we will not do in this guide), now is a good time to install “Microsoft Lync Server 2010, WMI Backwards Compatibility” utility (OCSWMIBC.msi), found in the installation media, for example:” D:\Setup\amd64\Setup”.
If, however, this is new Lync install in a lab and OCs is not present, skip this step.
Because THIS server will be our first Lync Server in the deployment, we must run “Prepare first Standard Edition Server” task form the Deployment Wizard. This will prepare the SQL storage for our Central Management Store. CMS description can be found here: http://technet.microsoft.com/en-us/library/gg398089.aspx.
***As you can see, the Wizard installs SQL 2008 Express edition which will hold our Lync deployment configuration (hence “Central Management Store”). Be patient and do not fiddle with your server while installing. Now is a good time to grab a beer, have a smoke or whatever your vice is…
Once again my heart is full with joy - “Task status: Completed.”
Next we will run Topology Builder for first time and begin to build our first server… late next week. My lovely wife calling me to help her packing for our trip to Enterprise Connect conference in Orlando. It never stop amazes me how big her shoe collection is… Sometime I think Imelda Marcos finally found a match…
Meanwhile, watch the "First run videos":
Sunday, February 27, 2011
Lync 2010 Deployment Guide (Prepare our first Lync Server)
Before we proceed with our first
Lync server deployment, prerequisites must be installed as described here: http://technet.microsoft.com/en-us/library/gg412778.aspx
…and since we are here already, why don’t we install VC++ Redistributable…
Now run the following from command prompt:
Lync server deployment, prerequisites must be installed as described here: http://technet.microsoft.com/en-us/library/gg412778.aspx
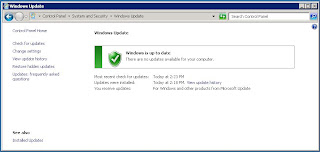
I will begin by running Windows Update on my server as many times as necessary until “Windows is up to date” appears.
***I will even install .NET Framework 4 just to see if will affect our Lync installation down on the road.
The easiest way to install prerequisites (at least for me) is to run the following commands from command prompt:
servermanagercmd -install Net-Framework Net-Framework-Core Net-Win-CFAC Net-HTTP-Activation NET-HTTP-Activation WAS WAS-Process-Model WAS-Net-Environment WAS-Config-ApIs
servermanagercmd.exe -install Web-Server Web-Asp-Net Web-Windows-Auth Web-Metabase Web-Mgmt-Compat Web-WMI Web-Lgcy-Scripting Web-Client-Auth Web-Http-Redirect Web-Log-Libraries Web-Http-Tracing Web-Basic-Auth Web-Scripting-Tools
servermanagercmd -install MSMQ MSMQ-Services MSMQ-Server MSMQ-Directory
Install the Rewrite module. You will find it on your Lync installation media, for example: D:\Setup\amd64
…and since we are here already, why don’t we install VC++ Redistributable…
Now run the following from command prompt:
pkgmgr.exe /ip /m:"C:\Windows\servicing\Packages\Microsoft-Windows-Media-Format-Package~31bf3856ad364e35~amd64~~6.1.7600.16385.mum"
***ATTENTION! The above command applies to Windows Server 2008 R2. If you will install Lync on W2K8 R2 SP1, here is the proper command:
pkgmgr.exe /ip /m:"C:\Windows\servicing\Packages\Microsoft-Windows-Media-Format-Package~31bf3856ad364e35~amd64~~6.1.7601.17514.mum"
***At this point, the system will restart! When you login back, go to Server Manager -> Features and add “Desktop Experience”. I found that later - if or when you enable “Music On Hold” on your
Lync server, the log will register an error that “either the file is not present (while it is there) or is unknown format (huh, WMA is unknown?!?)
…and indeed, a reboot is required… again.
Now our first Lync server is ready for some serious work.
Lync 2010 Deployment Guide (Prepare Forest and Domain)
First we need to prepare our Active Directory Forest and Domain for Lync 2010. The steps are described here: http://technet.microsoft.com/en-us/library/gg398869.aspx.
I will do it by using Setup on my Domain Controller from Lync installation media as described here: http://technet.microsoft.com/en-us/library/gg412729.aspx.
First, we are prompted to install Visual C++ 2008 Redistributable.
Once installed, Setup dialog box appears.
Click Install and accept the License Agreement on the next screen and click OK. At this point, Lync Server Code Components will be installed and the deployment wizard will appear.
Click “Prepare Active Directory”
***As you can see, some options are “dimmed”. This is because the preparation requires strict order and the wizard help us to follow it.
Click the only available option to prepare the Schema.
***Have patience. It might take minute or two. Wait until the “Finish” button is available. I strongly advise you - always examine the result of the any action you perform via the wizard. In our case, the schema preparation was successful.
***In my case I have only one Domain Controller and will not worry about Replication. However, if you are deploying Lync in Production (which means you have more than one DC), always wait/check if the replication was completed.
Now “Prepare Current Forest” button is available. Click “Run”.
***In my case, I will prepare the “Local Domain”, since it is the only domain in the forest.
Verify the successful completion and click “Finish”. Prepare Current Domain is now available. Click “Run”.
***Shall you see an error on any of the above steps, do not run to Google and apply every “fix” you might find. Ask the community first: http://social.technet.microsoft.com/Forums/en-US/category/ocs. Here you will find first hand help and the risk to wreak havoc in your production environment is much lower.
Exit the “Deployment Wizard” and eject the media from your Domain Controller – we are now done.
***Another advice: Right now, use “Active Directory Users and Computers” console and add your account to CSAdministrator” group. By doing so, later you will spare yourself the question “Why I cannot access Lync CP (Control Panel)”
I will do it by using Setup on my Domain Controller from Lync installation media as described here: http://technet.microsoft.com/en-us/library/gg412729.aspx.
First, we are prompted to install Visual C++ 2008 Redistributable.
Once installed, Setup dialog box appears.
Click Install and accept the License Agreement on the next screen and click OK. At this point, Lync Server Code Components will be installed and the deployment wizard will appear.
Click “Prepare Active Directory”
***As you can see, some options are “dimmed”. This is because the preparation requires strict order and the wizard help us to follow it.
Click the only available option to prepare the Schema.
***Have patience. It might take minute or two. Wait until the “Finish” button is available. I strongly advise you - always examine the result of the any action you perform via the wizard. In our case, the schema preparation was successful.
***In my case I have only one Domain Controller and will not worry about Replication. However, if you are deploying Lync in Production (which means you have more than one DC), always wait/check if the replication was completed.
Now “Prepare Current Forest” button is available. Click “Run”.
***In my case, I will prepare the “Local Domain”, since it is the only domain in the forest.
Verify the successful completion and click “Finish”. Prepare Current Domain is now available. Click “Run”.
***Shall you see an error on any of the above steps, do not run to Google and apply every “fix” you might find. Ask the community first: http://social.technet.microsoft.com/Forums/en-US/category/ocs. Here you will find first hand help and the risk to wreak havoc in your production environment is much lower.
Exit the “Deployment Wizard” and eject the media from your Domain Controller – we are now done.
***Another advice: Right now, use “Active Directory Users and Computers” console and add your account to CSAdministrator” group. By doing so, later you will spare yourself the question “Why I cannot access Lync CP (Control Panel)”
Saturday, February 26, 2011
Lync 2010 Deployment Guide
Sometimes I consider myself “the luckiest man alive” for at least two reasons - I am married for the same woman for 25 years (and still in love as I was the day I met her on a bus station) and… because I have never experienced most or any of the problems other UC enthusiasts have had and requested help from the Lync community (http://social.technet.microsoft.com/Forums/en-US/category/ocs). I almost feel obligated to do once again a complete Lync 2010 installation, while taking a screenshots and inserting my comments with hope others can use it as a guide and/or point of reference.
Because I have more confidence in my Lync knowledge than English language skills, any comments will be greatly appreciated.
While I am waiting “Windows Server 2008 R2 Standard, Enterprise, Datacenter, and Web with Service Pack 1) installation media to download from TechNet, let’s talk about what is that we want to achieve.
I have public domain “drago.ws”. I am planning to install new domain controller on my virtual host machine “dc01.drago.local” where Windows 2008 R2 Service Pack 1 will be used as OS (this is, to see the possible impact, if any) Service pack one will have on our future Lync 2010 installation.
Because I have never done installation of “split domain” environment, this will be a good learning curve for me as well – I will learn how to do it and the final result will be published here. Also, I will “play” with two scenarios – using singe IP address for the public Edge interface and later – three separate IP addresses (NAT will be used in both, since direct public routable IP address setup cannot be easier and straightforward).
Here is our table:

My domain controller will also be my Domain Certificate Authority for drago.local domain.
Step 1 – Prepare Active Directory Forest for Lync 2010
Step 2 - Prepare our first Lync Server for deployment
Step 3 - Before we start Topology Buider
Because I have more confidence in my Lync knowledge than English language skills, any comments will be greatly appreciated.
While I am waiting “Windows Server 2008 R2 Standard, Enterprise, Datacenter, and Web with Service Pack 1) installation media to download from TechNet, let’s talk about what is that we want to achieve.
I have public domain “drago.ws”. I am planning to install new domain controller on my virtual host machine “dc01.drago.local” where Windows 2008 R2 Service Pack 1 will be used as OS (this is, to see the possible impact, if any) Service pack one will have on our future Lync 2010 installation.
Because I have never done installation of “split domain” environment, this will be a good learning curve for me as well – I will learn how to do it and the final result will be published here. Also, I will “play” with two scenarios – using singe IP address for the public Edge interface and later – three separate IP addresses (NAT will be used in both, since direct public routable IP address setup cannot be easier and straightforward).
Here is our table:
My domain controller will also be my Domain Certificate Authority for drago.local domain.
Step 1 – Prepare Active Directory Forest for Lync 2010
Step 2 - Prepare our first Lync Server for deployment
Step 3 - Before we start Topology Buider
Saturday, August 28, 2010
Snom management (Part II)
I had a dream last night… for which I sincerely apologize now.
Since long time ago, when I woke up, I’ll turn on the TV and flip through the news channels with hope to hear the news that the Federal Government balanced the budget last night. So I did this morning, only to find out that since 47 years ago, no one is allowed to have a dream on this day. Oh well…
Managing Snom phone environment is not a dream. It takes, however, time and mental discipline to understand what a German mind wanted to say when wrote this manual. And now, I have even bigger problem to explain it in simple words. You see, we, whose native language is different from English, will construct every sentence on our language, translate it to English and say it, write it, whatever. So now I have to “decode” the German idea written on English, to Bulgarian and then back to English. What a mess…
With Snom, we have three core important components:
Upon boot, snom300 will submit “Vendor Class Identifier” via DHCP Option 60 (“snom300” in this case). In this post, we configured our DHCP server to respond with “Predefined Options” (that is, Options we want to supply to any device that reports THIS particular “Vendor Class”. The reason is – we might have configured DHCP to respond with “Provisioning URL = http://provisioning.drago.ws “ to all snom300 phones, but “Provisioning URL = fox.drago. ws” to all snom370, snom820 and snom870.
Once my snom300 obtains the Provisioning URL, the unit will send HTTP GET request to the URL in format http://provisioning.drago.ws/snom300.htm – snom300 (the vendor Identifier) is appended at the end of the URL. This is by design and for simplicity – you don’t have to worry about encapsulating Option 67 within Option 43, although this is possible and must be used in some cases. I might elaborate on this topic some other day… To reply to this request, we must have, indeed, file named “snom300.htm” in the rood of our webserver with the following content:
<?xml version="1.0" encoding="utf-8"?>
<setting-files>
<file url="https://provisioning.drago.ws/general.xml"/>
</setting-files>
We have just told the unit to look for file named “general.xml” at this URL – https://provisioning.drago.ws. First – note that I want any further exchange between the phone and the webserver to be encrypted and second, told the phone what is the URL. This is because I could redirect the phone to a different URL if I had reason to do so.
Look at this sample “general.xml” file content:
<?xml version="1.0" encoding="utf-8"?>
<settings>
<phone-settings>
<settings_refresh_timer perm="RW">3600</settings_refresh_timer>
<language perm="RW">English</language>
<web_language perm="RW">English</web_language>
<tone_scheme perm="RW">USA</tone_scheme>
<timezone perm="RW">USA-5</timezone>
<date_us_format perm="RW">on</date_us_format>
<time_24_format perm="RW">on</time_24_format>
<ntp_server perm="RW">10.0.0.91</ntp_server>
<ntp_refresh_timer perm="RW">86400</ntp_refresh_timer>
<retry_after_failed_register perm="RW">60</retry_after_failed_register>
<codec_tos perm="">184</codec_tos>
<signaling_tos perm="">184</signaling_tos>
<update_policy perm="RW">auto_update</update_policy>
<firmware_interval perm="RW">480</firmware_interval>
<firmware_status perm="RW">https://provisioning.drago.ws/firmware.xml</firmware_status>
</phone-settings>
</settings>
Line by line breakdown:
<settings_refresh_timer perm="RW">3600</settings_refresh_timer> - 3600 is the number in seconds the phone should request, obtain and apply this file again, in case we want to push any change of settings.
<language perm="RW">English</language> - Language to be applied to the phone display
<web_language perm="RW">English</web_language> - Language to be used for the phone's web interface
<tone_scheme perm="RW">USA</tone_scheme> - DTMF tone scheme to be applied to the phone
<timezone perm="RW">USA-5</timezone> - Time Zone (Eastern Standard Time in this case)
<date_us_format perm="RW">on</date_us_format> - Date format
<time_24_format perm="RW">on</time_24_format> - Time format (US or "the rest of the world")
<ntp_server perm="RW">10.0.0.91</ntp_server> - IP address or FQDN of NTP server to be used by the phone for the phone clock
<ntp_refresh_timer perm="RW">86400</ntp_refresh_timer> - 86400 is the number in seconds before the next time sync.
<retry_after_failed_register perm="RW">60</retry_after_failed_register> - interesting parameter that forces the phone to reboot itself when registration fails for number of seconds - 60 in this case.
<codec_tos perm="">184</codec_tos> - Here we instruct the phone to tag the RTP traffic with DSCP Option 46 (Expedited Forwarding) QoS Type Of Service.
<signaling_tos perm="">184</signaling_tos> - same as the above, but tagging SIP (signaling) traffic.
The last three lines require special attention.
<update_policy perm="RW">auto_update</update_policy> - here we tell the phone to apply the firmware update automatically without user interaction/approval
<firmware_interval perm="RW">480</firmware_interval> - Hre we tell the phone to check every (480 in this case) minutes if new firmware is available.
<firmware_status perm="RW">https://provisioning.drago.ws/firmware.xml</firmware_status> - ...and finally, where the phone should check for the most current firmware the admin wants to apply.
To wrap up, here is an example of work flow:
We unbox new unit. Connect it to the network and powered it. The phone tells DHCP which model it is. DHCP returns info where the phone should go first for settings. The phone downloads the settings, applies (time, language, firmware URL etc) and…
…reads “firmware.xml” file with the following content:
<?xml version="1.0" encoding="utf-8"?>
<firmware-settings>
<firmware perm="">https://provisioning.drago.ws/300/snom300-OCS-8.5.3-SIP-f.bin</firmware>
</firmware-settings>
Here we just told that the phone MUST have version “snom300-OCS-8.5.3-SIP-f.bin” currently installed. At this point, the phone will compare the current FW version to the one in the “firmware.xml” and now we have two possibilities – the firmware on the phone is the same (the counter is reset and new cycle of 480 minutes begins), or the firmware does not mach. If the phone is not on call or off-hook, it will reboot, download the new firmware, apply it, read the general.xml and firmware.xml and register if provisioned with a valid account.
I placed the .bin file in separate folder - “300”, in order to keep some consistency i.e. firmware for model 300 is located in folder “300”, the one for model 870 in folder… “870” and so on.
Next week we will discuss where the parameters like "date_us_format" - come from and how we can add additional parameters to our provisioning files to get the most of the manageability story of Snom VoIP phones.
Since long time ago, when I woke up, I’ll turn on the TV and flip through the news channels with hope to hear the news that the Federal Government balanced the budget last night. So I did this morning, only to find out that since 47 years ago, no one is allowed to have a dream on this day. Oh well…
Managing Snom phone environment is not a dream. It takes, however, time and mental discipline to understand what a German mind wanted to say when wrote this manual. And now, I have even bigger problem to explain it in simple words. You see, we, whose native language is different from English, will construct every sentence on our language, translate it to English and say it, write it, whatever. So now I have to “decode” the German idea written on English, to Bulgarian and then back to English. What a mess…
With Snom, we have three core important components:
- General Settings - settings which we want to apply to ALL Snom devices in our environment, for example, Language, Time Zone, Date Format, Time Format, VLAN’s, QoS tagging and so on.
- Phone Specific Settings – settings to be applied to each individual phone. I do not intend to elaborate on this too much since you don’t want to use it in your OCS/Wave14 environment – I will explain later.
- Firmware settings – information about the firmware version that MUST be installed on the unit.
In this example, I will refer to Snom300, but the concept is the same for all models. My domain is drago.ws and I have a webserver service installed on machine with FQDN - provisioning.drago.ws
Let’s put all his together.Upon boot, snom300 will submit “Vendor Class Identifier” via DHCP Option 60 (“snom300” in this case). In this post, we configured our DHCP server to respond with “Predefined Options” (that is, Options we want to supply to any device that reports THIS particular “Vendor Class”. The reason is – we might have configured DHCP to respond with “Provisioning URL = http://provisioning.drago.ws “ to all snom300 phones, but “Provisioning URL = fox.drago. ws” to all snom370, snom820 and snom870.
Once my snom300 obtains the Provisioning URL, the unit will send HTTP GET request to the URL in format http://provisioning.drago.ws/snom300.htm – snom300 (the vendor Identifier) is appended at the end of the URL. This is by design and for simplicity – you don’t have to worry about encapsulating Option 67 within Option 43, although this is possible and must be used in some cases. I might elaborate on this topic some other day… To reply to this request, we must have, indeed, file named “snom300.htm” in the rood of our webserver with the following content:
<?xml version="1.0" encoding="utf-8"?>
<setting-files>
<file url="https://provisioning.drago.ws/general.xml"/>
</setting-files>
We have just told the unit to look for file named “general.xml” at this URL – https://provisioning.drago.ws. First – note that I want any further exchange between the phone and the webserver to be encrypted and second, told the phone what is the URL. This is because I could redirect the phone to a different URL if I had reason to do so.
Look at this sample “general.xml” file content:
<?xml version="1.0" encoding="utf-8"?>
<settings>
<phone-settings>
<settings_refresh_timer perm="RW">3600</settings_refresh_timer>
<language perm="RW">English</language>
<web_language perm="RW">English</web_language>
<tone_scheme perm="RW">USA</tone_scheme>
<timezone perm="RW">USA-5</timezone>
<date_us_format perm="RW">on</date_us_format>
<time_24_format perm="RW">on</time_24_format>
<ntp_server perm="RW">10.0.0.91</ntp_server>
<ntp_refresh_timer perm="RW">86400</ntp_refresh_timer>
<retry_after_failed_register perm="RW">60</retry_after_failed_register>
<codec_tos perm="">184</codec_tos>
<signaling_tos perm="">184</signaling_tos>
<update_policy perm="RW">auto_update</update_policy>
<firmware_interval perm="RW">480</firmware_interval>
<firmware_status perm="RW">https://provisioning.drago.ws/firmware.xml</firmware_status>
</phone-settings>
</settings>
Line by line breakdown:
<settings_refresh_timer perm="RW">3600</settings_refresh_timer> - 3600 is the number in seconds the phone should request, obtain and apply this file again, in case we want to push any change of settings.
<language perm="RW">English</language> - Language to be applied to the phone display
<web_language perm="RW">English</web_language> - Language to be used for the phone's web interface
<tone_scheme perm="RW">USA</tone_scheme> - DTMF tone scheme to be applied to the phone
<timezone perm="RW">USA-5</timezone> - Time Zone (Eastern Standard Time in this case)
<date_us_format perm="RW">on</date_us_format> - Date format
<time_24_format perm="RW">on</time_24_format> - Time format (US or "the rest of the world")
<ntp_server perm="RW">10.0.0.91</ntp_server> - IP address or FQDN of NTP server to be used by the phone for the phone clock
<ntp_refresh_timer perm="RW">86400</ntp_refresh_timer> - 86400 is the number in seconds before the next time sync.
<retry_after_failed_register perm="RW">60</retry_after_failed_register> - interesting parameter that forces the phone to reboot itself when registration fails for number of seconds - 60 in this case.
<codec_tos perm="">184</codec_tos> - Here we instruct the phone to tag the RTP traffic with DSCP Option 46 (Expedited Forwarding) QoS Type Of Service.
<signaling_tos perm="">184</signaling_tos> - same as the above, but tagging SIP (signaling) traffic.
The last three lines require special attention.
<update_policy perm="RW">auto_update</update_policy> - here we tell the phone to apply the firmware update automatically without user interaction/approval
<firmware_interval perm="RW">480</firmware_interval> - Hre we tell the phone to check every (480 in this case) minutes if new firmware is available.
<firmware_status perm="RW">https://provisioning.drago.ws/firmware.xml</firmware_status> - ...and finally, where the phone should check for the most current firmware the admin wants to apply.
To wrap up, here is an example of work flow:
We unbox new unit. Connect it to the network and powered it. The phone tells DHCP which model it is. DHCP returns info where the phone should go first for settings. The phone downloads the settings, applies (time, language, firmware URL etc) and…
…reads “firmware.xml” file with the following content:
<?xml version="1.0" encoding="utf-8"?>
<firmware-settings>
<firmware perm="">https://provisioning.drago.ws/300/snom300-OCS-8.5.3-SIP-f.bin</firmware>
</firmware-settings>
Here we just told that the phone MUST have version “snom300-OCS-8.5.3-SIP-f.bin” currently installed. At this point, the phone will compare the current FW version to the one in the “firmware.xml” and now we have two possibilities – the firmware on the phone is the same (the counter is reset and new cycle of 480 minutes begins), or the firmware does not mach. If the phone is not on call or off-hook, it will reboot, download the new firmware, apply it, read the general.xml and firmware.xml and register if provisioned with a valid account.
I placed the .bin file in separate folder - “300”, in order to keep some consistency i.e. firmware for model 300 is located in folder “300”, the one for model 870 in folder… “870” and so on.
Next week we will discuss where the parameters like "
Tuesday, August 24, 2010
Managing Snom endpoints in your environment
Managing any VoIP endpoint could be a nightmare or a pleasure, depend of how you view it. Pretty much as Group Policy – you might not use it at all and the environment will still work, although every time a change must be made, one needs to touch every device. Or… make a single change on central location and have it applied at once. Snom endpoints are no exception. Being a multi-platform, multi-protocol device, it often confuses the administrator/enduser with the rich set of features and… the end result could be either mismanagement (lack of management, that is) or over complication. Based on my experience, I intend to make series of posts describing some of the methods and procedures necessary to have one healthy Snom environment.
Snom phones rely on provisioning server, essentially an http or https server that responds to a particular request with specific xml file(s), which are later applied to all phones or a particular one, thus managing settings, user account and so on. Before we go in to details about the format and the content of the provisioning files, we must answer perhaps the most important question – how Snom phone will “know” where to go to get the provisioning information?
Snom uses DHCP Option 66 (TFTP Server Name) to obtain information of the provisioning server URL. One question comes immediately to mind – “Ok… we are not booting from TFTP, why using this option in first place. And, I already use it for other devices on the network… am I doomed?”
My answer to the first question – I have no idea! Perhaps Snom ran out of “options”? My goal is, however, to show you an alternative way to utilize this option and have central management solution in place.
As many other well designed network devices, Snom endpoints will submit Option 60 (Vendor Class Identifier) in the in the DHCP Discovery broadcast. The goal is – if the DHCP server understands the option and the Scope/Server options are properly configured, the DHCP response will contain a very specific values meant for the requester (Snom) only. With other words, you could already have an Option 66 set for some purposes and still supply your Snom phones with unique value (namely “Provisioning URL”).
Before we precede with the configuration steps of our DHCP server, there are few important notes:
Right click on IPv4 and select “Define Vendor Classes”
In DHCP Vendor Classes window, click Add button.
In New Class window, populate as shown and click OK button.
Repeat the above steps for each Snom model in your environment.
Right click on IPv4 and select “Set Predefined Options”
On “Predefined Options and Values”, click Add
Select snomXXX model and click Add
In Options Type windows, populate the fields as shown:
Click OK and OK again.
***by setting this prerequisites, we will send the provisioning URL via option 66, BUT encapsulated in Option 43 i.e. different way compared to DHCP Standard Option 66.
Now right click over the Scope Options (of the scope your phones are on) and select “Configure Options”.
Click “Advanced” tab in “Scope Options” window and select snomXXX from “Vendor Class” dropdown menu.
Tick “66 Option 43”…
…and enter the provisioning URL of your Provisioning/Settings Server.
***This part can be very tricky and need a little explanation. Notice that the box has three sections – Data, Binary, and ASCII.
Click “OK” and you are all set
In the next post of this series I will explain how exactly Snom Provisioning works and what we can do with it.
P.S. Have I mentioned that Snom300 works just fine with Wave14?
Snom phones rely on provisioning server, essentially an http or https server that responds to a particular request with specific xml file(s), which are later applied to all phones or a particular one, thus managing settings, user account and so on. Before we go in to details about the format and the content of the provisioning files, we must answer perhaps the most important question – how Snom phone will “know” where to go to get the provisioning information?
Snom uses DHCP Option 66 (TFTP Server Name) to obtain information of the provisioning server URL. One question comes immediately to mind – “Ok… we are not booting from TFTP, why using this option in first place. And, I already use it for other devices on the network… am I doomed?”
My answer to the first question – I have no idea! Perhaps Snom ran out of “options”? My goal is, however, to show you an alternative way to utilize this option and have central management solution in place.
As many other well designed network devices, Snom endpoints will submit Option 60 (Vendor Class Identifier) in the in the DHCP Discovery broadcast. The goal is – if the DHCP server understands the option and the Scope/Server options are properly configured, the DHCP response will contain a very specific values meant for the requester (Snom) only. With other words, you could already have an Option 66 set for some purposes and still supply your Snom phones with unique value (namely “Provisioning URL”).
Before we precede with the configuration steps of our DHCP server, there are few important notes:
- Each Snom model submits the word “snom” (lower case!) and the model number in a single string i.e. snom300, snom320, snom360…snom870 and so on as “Vendor Class Identifier”. I got to think today - why not only “snom” so that we will have to configure the entire shebang one time only? Well, model 300 (with its simplicity), compared to 870 with the large color touch screen display, is like Ford Fiesta next to Cadillac Escalade. And… Snom 8xx series can show live stream (security camera for example) on the display… bottom line - different features require different provisioning options.
- This example is for Microsoft DHCP server. If you are Linux guy, the assumption is that you already “know it all” and/or your Ubuntu or SUSE or whatever makes you hot has configured itself already, fearing the possibility to face you… or Chuck Norris…
- The screenshots are from DHCP mmc on Windows 2008 R2
Right click on IPv4 and select “Define Vendor Classes”
In DHCP Vendor Classes window, click Add button.
In New Class window, populate as shown and click OK button.
Repeat the above steps for each Snom model in your environment.
Right click on IPv4 and select “Set Predefined Options”
On “Predefined Options and Values”, click Add
Select snomXXX model and click Add
In Options Type windows, populate the fields as shown:
Click OK and OK again.
***by setting this prerequisites, we will send the provisioning URL via option 66, BUT encapsulated in Option 43 i.e. different way compared to DHCP Standard Option 66.
Now right click over the Scope Options (of the scope your phones are on) and select “Configure Options”.
Click “Advanced” tab in “Scope Options” window and select snomXXX from “Vendor Class” dropdown menu.
Tick “66 Option 43”…
…and enter the provisioning URL of your Provisioning/Settings Server.
***This part can be very tricky and need a little explanation. Notice that the box has three sections – Data, Binary, and ASCII.
- Don’t worry about Data, nor Binary (unless you hate your life)
- Click under ASCII (on right of the “.”
- Backspace one to remove that “.” Or you will get your phone in some sort of loop (I need to talk to the guys in Berlin about that)
Click “OK” and you are all set
In the next post of this series I will explain how exactly Snom Provisioning works and what we can do with it.
P.S. Have I mentioned that Snom300 works just fine with Wave14?
Saturday, August 21, 2010
Igor! IT'S ALIVE, IT'S ALIVE!!! (At least Dr. Frankenstein never signed NDA and could share the secret… if he wanted to.)
Georgia Military College proudly announces successful implementation of the next generation of Microsoft’s communication and collaboration platform – code name “Wave 14” in Production environment! We are now moving users from OCS 2007 R2 to Wave 14 faster than the Congress approval rating is going down… which means – fast as we can!
I am very excited to see the product evolving in positive direction. The new features are not randomly thrown here and there (because “Cisco have it”), but rather carefully crafted based on end-user needs and feedback. I am confident that Wave 15 will be a complete Enterprise solution simply because more and more companies today see the added value of UC to the business process, which means more and more feedback will flow to Microsoft…
Indeed, to talk about the deployment steps and post screenshots now will be (most probably) irrelevant, since this is Beta and any changes can occur between now and RTM. I strongly encourage my colleagues from the EDU sector to evaluate the solution as soon as it becomes publicly available. It is a live change experience, believe me. Those who hate you will hate you even more, but “undecided” will join you faster than Arlen Specter went Democrat…
I am very excited to see the product evolving in positive direction. The new features are not randomly thrown here and there (because “Cisco have it”), but rather carefully crafted based on end-user needs and feedback. I am confident that Wave 15 will be a complete Enterprise solution simply because more and more companies today see the added value of UC to the business process, which means more and more feedback will flow to Microsoft…
Indeed, to talk about the deployment steps and post screenshots now will be (most probably) irrelevant, since this is Beta and any changes can occur between now and RTM. I strongly encourage my colleagues from the EDU sector to evaluate the solution as soon as it becomes publicly available. It is a live change experience, believe me. Those who hate you will hate you even more, but “undecided” will join you faster than Arlen Specter went Democrat…
Subscribe to:
Posts (Atom)